Timber Flooring
Updated: 2022-01-24
Article by Bill Bradley
There are quite a few options when it comes to timber flooring and I'l try to list a few here.
There are quite a few options when it comes to timber flooring and I'l try to list a few here.
- Just about all the timber flooring on the market today is tongue and grooved. (T&G) That is, one of the edges is grooved and one has a tongue machined onto it, so that abutting boards fit together and are kept in line with each other.
- Even sheets of flooring ply, that are intended to have other materials laid on top of them as the finish, have grooves around the edge, and they are fitted together using loose plastic tongues.
- The very first floors that I came across and worked on where softwood T&G boards, laid onto softwood floor joists that in turn sat on brick walls. They were cheap and fast to lay, cramped and nailed through the face. They were always intended to be covered by some other covering.
- Hardwood T&G floors are stronger, more hard wearing and almost always sanded and sealed to give a hard durable and good looking finish to the floor. They can be secret nailed (the fixings hidden), or they can be face nailed.
- In addition to fixing flooring onto conventional timber joists, it is possible to fix the floor to battens that are fixed to concrete floors.
- There are still around many old hardwood parquet floors, which are known for long life and good looks. These consist of solid pieces of timber, for example they could be up to 35mm thick and be say 75 wide by 225 long. They are laid in various patterns, herringbone being a popular one.
- More modern methods of getting the parquet look, consist of laying 10mm thick fingers of hardwood in various patterns onto a scrim of mesh material. They are then glued down to either a ply or concrete base.
- There are a lot of new variations on an old idea. The old hardwood strip flooring.
- These are ply or even MDF type base materials, with thin faces of hardwood timber glued to them. They come in panels of say 300 x 1200, and when laid they have the appearance of a hardwood T&G floor with say 60 wide boards.
- This particularly modern type of floor has a wide range of qualities and prices.
- Some of them go down almost like a solid floor and require sanding and sealing after laying, while others are pre finished.
- Some of them require cramping and nailing, and others snap together with tight joints.
- The snap together ones are commonly called floating flooring, that is they are not fixed down at all, but sit on an underlay and have a slightly spongy feel underfoot.
Tongue and grooved boards
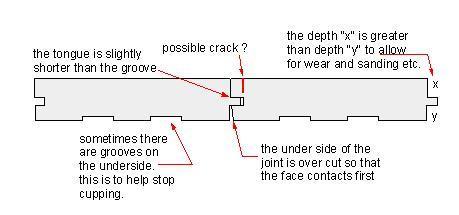
Flooring - Tongue and grooved boards.
Above is a sketch of a couple of solid timber T&G floorboards. If you have a floor like this and you can see odd cracks where I have put the red line in the sketch, it means that your floor has been sanded a touch too thin and the grooves are starting to split. Be very careful if you are going to sand it and reseal. You could make the situation a lot worse.
If you don't have the cracks, and you are going to hire a sander and do it yourself, take it easy with the coarse sanding. There is only so much you can take off, before you start to have problems.
Laying a nailed through the face timber floor
In the old days I fixed a lot of cypress pine flooring, which was naturally air dried, and always a bit of a problem as to the moisture content. When the wall framing and the roof was finished, quite often we would cut in the floor, laying it fairly loose,no nails, upside down. We would then carry on with the outside cladding, fixing windows, stairs etc. This gave the floor sometimes maybe two to four weeks extra to dry out. When we were happy that it was as dry as we could get it, we turned it face up and fixed it.
This is no longer done, as just about all the flooring available now is kiln dried and comes in sealed packs, but if you are buying opened packs and you have the slightest doubts, get the moisture content checked.
- Check your floor joists and straighten as needed. You won't get another chance.
- The floor joists are always laid round up, camber up. With time and traffic they tend to settle a bit.
- Some could be almost straight and some could be very bent. I test across the top of the joists with a straight edge and just plane off the real high ones. Say any that are sticking up more than 5mm higher than the rest.
- Don't try to get them all dead straight. Leave an average camber. If you are the one fixing the joists, if possible get the straightest ones near to the walls
- If you have the slightest doubt that the floor joists are a bit light on, they feel a bit springy, never mind what anybody else says, stiffen the whole floor up with a couple of rows of bridging or noggins or herringbone bracing.
- When I built our first house I used 125 x 50 floor joists. They were the approved size for the span etc. and they were cheaper. I regretted it. The floors always had a springy, less than solid feel. For the small amount of extra cash 150 x 50 would have been so much better.
- I've got a bad back and arthritis in my knees, but you will never convince me to lay a quality floor with a nail gun. An old floor sander and finisher once told me that he could often feel the boards moving under his large machine, when they had been fixed with "T" nails.
I use 50 x 2.8 thick bullet head nails, usually two nails per board. All hand nailed, with my standard Estwing claw hammer. I nail them to a straight pencil line, no guessing.
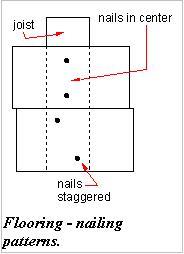
This is internal floors we are talking about, on external decks I stagger the nails. (The theory behind staggering them is that the joist is less likely to split along the line of nails).
This is internal floors we are talking about, on external decks I stagger the nails. (The theory behind staggering them is that the joist is less likely to split along the line of nails).
Standard boards are always cut and joined on a joist. At the joins I always pre-drill a hole for the nails. I use thinner nails, 2.0mm at the joins. The rest of the nails just get hammered in without pre-drilling, unless the the timber is very prone to splitting.
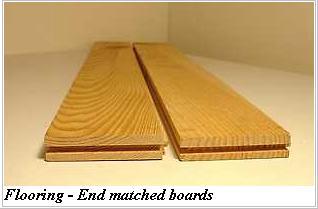
Almost universal nowadays is the use of end matched flooring. As you can see in this photo the individual boards are all machined with a tongue on one end and a groove on the other. The fact that the boards are end matched makes it easy to lay the floor.
- With end matched boards, there is no need to join on a joist, so boards are laid as they come out of the pack, and the joints are random.
- The offcut from the last board laid is straight away used for the first board in the next row. Thus virtually no waste.
- The manufacturers do well out of end matching, because they can use and sell short lengths that would otherwise be scrap.
Cramp it and cramp it tight then fix it solid
For laying a solid timber tongue and groove floor a set of flooring clamps or cramps is essential.You need a minimum of two, but usually more are needed. I used to have about five of these. They are capable of exerting a hell of a lot of pressure on the boards.
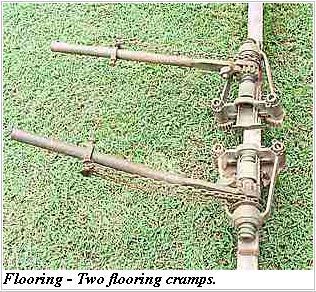 The clamp is held by the handle and swung into the joist. The two serrated teeth looking things grip the joist and as you apply pressure the teeth grip the timber.
When the teeth are a bit worn, or if the joist timber is like the Selangan Batu we use,(hard as the hobs of hell), then a couple of belts on the gripping pawls with a hammer sets the clamp firm.
For quick winding in and out the chain is used. The lever handle is used to apply the real pressure.
These type of clamps are very fast to use. You can get them fixed and working in a very short time. I have seen other types, but nothing to beat these for speed of use, range of push and cramping power. They do of course mark the joists a bit.
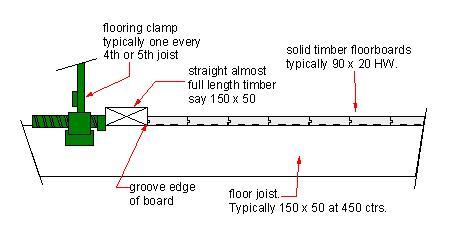
Here is a sketch of the clamping setup. Always clamp against a length of solid timber. Preferably almost the full length of the room you are working in.
The clamp is held by the handle and swung into the joist. The two serrated teeth looking things grip the joist and as you apply pressure the teeth grip the timber.When the teeth are a bit worn, or if the joist timber is like the Selangan Batu we use,(hard as the hobs of hell), then a couple of belts on the gripping pawls with a hammer sets the clamp firm.
For quick winding in and out the chain is used. The lever handle is used to apply the real pressure.
These type of clamps are very fast to use. You can get them fixed and working in a very short time. I have seen other types, but nothing to beat these for speed of use, range of push and cramping power. They do of course mark the joists a bit.
Here is a sketch of the clamping setup. Always clamp against a length of solid timber. Preferably almost the full length of the room you are working in.
These clamps are so good, that there is a tendency to try to do too many boards in one hit. What happens then is that the boards start to lift off the joists in a curve. If you press on, the whole lot buckles up and breaks free, and you have to set it all up again.
To stop this happening, lay a length of timber across the boards being clamped, and stand on it to use your body weight to stop the boards lifting.
When we have a section all cramped in position we nail it temporarily, with enough nails to hold it, then do another section. When all the floor is in place, then comes the fun part, nailing off. Try to get in a rhythm, swing the hammer from the end and let the swing do the work. Oh my poor back is aching just thinking about it.
Don't punch the nails as soon as you have laid the floor. Leave the punching until just before the floor sander arrives, that way no bits of crap and grit get into the holes. Some floor sanders prefer to do the punching themselves. That way they know it is done right. A nail that is not punched deep enough can stuff up their sandpaper on the machine.
I have heard of owner's and DIY people doing their own sanding and finishing. The machine sanders that I have seen in the hire places have been nothing like as big and good as the ones that a pro floor sander uses. By all means lay your own floorboards, but I would advise you to get a pro to do sand and seal.
If you do tackle the job yourself, remember to keep the doors and windows closed when you are doing the coating. A wind or draft can and does set the sealer off too quick and gives the surface an uneven appearance.
Bill has his own building related website
Read more about flooring here
Comments (0)