Micro Hoods Add Space and Convenience to the Kitchen
Atnaujinta: 2021-10-20
By Paul Bianchina
Inman News
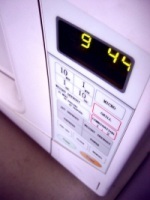 One of the most useful and efficient items to arrive on the kitchen appliance scene in recent years is the micro-hood, and combination of microwave and exhaust hood. Micro-hoods solve the problem of how to locate the microwave in a place that's both convenient and out of the way by mounting it up at a good workable height over the range, in the location where the exhaust hood is normally located.To overcome the loss of the exhaust hood in this location, the micro-hood also has a powerful built-in squirrel-cage fan that's quiet and actually more powerful than many standard exhaust hood fans. (A squirrel-cage fan is a horizontally mounted cylinder with a series of horizontal fan blades in it, somewhat similar to the exercise wheel seen in a hamster's cage -- hence the name). Also built into the micro-hood is a light fixture, typically with two intensities -- high, which nicely lights up the cooktop when you're cooking, and low, which makes a great nightlight.
What's Available
All micro-hoods are made in standard 30-inch width, which replaces any type or style of 30-inch range hood. If your existing hood is 36- or 42-inches wide, most manufacturers also offer filler panels which fill in the additional width between the sides of the microwave and the sides of the cabinet -- some types of filler are basically an open shelf which lets it double as a small bookshelf or spice shelf. You can also have fillers custom made from wood to match your cabinets.
Micro-hoods are available in both vented and non-vented versions. The vented version, though more difficult to install, is preferable since it gives not only a way of removing cooking odors, it also -- and even more importantly -- removes excess moisture from the air and vents it to the outside. Non-vented micro-hoods, also called recirculating hoods, take in the air in one area, treat it through any of a variety of filters, and exhaust it back into the room. If you opt for a recirculating micro-hood, look for one with a charcoal filter, even if it's optional -- they're much more effective at odor removal.
As with any of the dozens and dozens of standard microwaves on the market, the micro-hoods are available with a wide range of optional features. These include multiple power settings, digital readouts, defrost and warming cycles, two-level cooking racks, temperature probes, and much more. Combination microwave and convection ovens are also available in a micro-hood style.
Micro-hoods are available from virtually every manufacturer that makes kitchen appliances, including KitchenAid, Whirlpool, General Electric, and many others. You'll find them in white, almond, black, and several combinations of these colors.
Installation
Installation is a little more exacting and time-consuming than installing a standard exhaust hood. For one thing, these units are quite heavy when compared to a standard hood, ranging from about 50 pounds to over 100 -- and that's empty. As a result, a sturdy mounting bracket system is required. Where a standard exhaust hood screws up to the underside of the cabinet with wood screws, the typical micro-hood has a sturdy steel bracket or box that is attached to the wall by driving lag bolts into the studs, then the appliance itself hangs from the bracket or is slipped into the mounting box and secured.
Venting is done either through the back or the top of the unit, using rectangular sheet metal ductwork (you can then use a square-to-round transition if you want to adapt the unit to standard round duct pipe). If you're on an outside wall, you can often vent horizontally straight off the back of the unit and through the wall. To vent through the attic, come off the top of the unit and go up from there. A block-off plate is supplied with the appliance to cover and seal the unused vent outlet on the top or the back, depending on your preferred installation.
For both the mounting of the unit and the venting, a template is typically provided to help you locate the mounting holes and the vent cutout. Again, proper positioning and support is essential, so follow the manufacturer's instructions carefully.
One of the most useful and efficient items to arrive on the kitchen appliance scene in recent years is the micro-hood, and combination of microwave and exhaust hood. Micro-hoods solve the problem of how to locate the microwave in a place that's both convenient and out of the way by mounting it up at a good workable height over the range, in the location where the exhaust hood is normally located.To overcome the loss of the exhaust hood in this location, the micro-hood also has a powerful built-in squirrel-cage fan that's quiet and actually more powerful than many standard exhaust hood fans. (A squirrel-cage fan is a horizontally mounted cylinder with a series of horizontal fan blades in it, somewhat similar to the exercise wheel seen in a hamster's cage -- hence the name). Also built into the micro-hood is a light fixture, typically with two intensities -- high, which nicely lights up the cooktop when you're cooking, and low, which makes a great nightlight.What's Available
All micro-hoods are made in standard 30-inch width, which replaces any type or style of 30-inch range hood. If your existing hood is 36- or 42-inches wide, most manufacturers also offer filler panels which fill in the additional width between the sides of the microwave and the sides of the cabinet -- some types of filler are basically an open shelf which lets it double as a small bookshelf or spice shelf. You can also have fillers custom made from wood to match your cabinets.
Micro-hoods are available in both vented and non-vented versions. The vented version, though more difficult to install, is preferable since it gives not only a way of removing cooking odors, it also -- and even more importantly -- removes excess moisture from the air and vents it to the outside. Non-vented micro-hoods, also called recirculating hoods, take in the air in one area, treat it through any of a variety of filters, and exhaust it back into the room. If you opt for a recirculating micro-hood, look for one with a charcoal filter, even if it's optional -- they're much more effective at odor removal.
As with any of the dozens and dozens of standard microwaves on the market, the micro-hoods are available with a wide range of optional features. These include multiple power settings, digital readouts, defrost and warming cycles, two-level cooking racks, temperature probes, and much more. Combination microwave and convection ovens are also available in a micro-hood style.
Micro-hoods are available from virtually every manufacturer that makes kitchen appliances, including KitchenAid, Whirlpool, General Electric, and many others. You'll find them in white, almond, black, and several combinations of these colors.
Installation
Installation is a little more exacting and time-consuming than installing a standard exhaust hood. For one thing, these units are quite heavy when compared to a standard hood, ranging from about 50 pounds to over 100 -- and that's empty. As a result, a sturdy mounting bracket system is required. Where a standard exhaust hood screws up to the underside of the cabinet with wood screws, the typical micro-hood has a sturdy steel bracket or box that is attached to the wall by driving lag bolts into the studs, then the appliance itself hangs from the bracket or is slipped into the mounting box and secured.
Venting is done either through the back or the top of the unit, using rectangular sheet metal ductwork (you can then use a square-to-round transition if you want to adapt the unit to standard round duct pipe). If you're on an outside wall, you can often vent horizontally straight off the back of the unit and through the wall. To vent through the attic, come off the top of the unit and go up from there. A block-off plate is supplied with the appliance to cover and seal the unused vent outlet on the top or the back, depending on your preferred installation.
For both the mounting of the unit and the venting, a template is typically provided to help you locate the mounting holes and the vent cutout. Again, proper positioning and support is essential, so follow the manufacturer's instructions carefully.
Comments (0)