Ceramic Tile Basics
Updated: 2022-01-13
Article by Bill Bradley
Setting Out Ceramic Tiles
Here are a few guideline for setting out a tile job. I say guidelines and not rules, because every job is different, and a rule that works in one place may look silly in another.
Always try to keep cut tiles at least a half tile or greater. The reason for this is that it just looks better. Also small differences the walls are not seen. A wall that is 5mm out of plumb or out of square will not be obvious when a 140mm cut tile abuts it, but if the cut tile row is 20mm to 15mm, then the eye will be able to pick this.
In the sketch on the right, the grey are is to be tiled. Lets say it is a bathroom wall.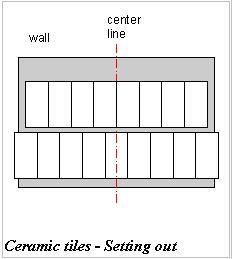
I mark a center line on the wall and pencil in a row of tiles (top row). Straight away I can see that I will have a small cut tile at each end. So I start again, this time with the first tile half way on the center line. This looks far better. Note that by doing it this way, I still only use the same number of tiles.
So to start tiling that wall I would find the center of the wall, and half a tile left or right of it I would make a vertical line the full height of the proposed tiles. This line is my starting line. I wouldn't start at the side. By starting at the middle I minimise any creep or discrepancy that may build up as I go along.
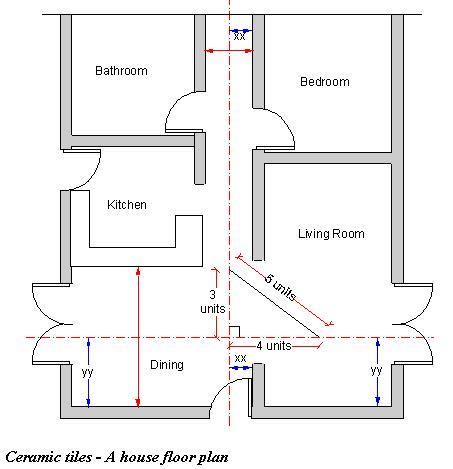
In the house floor plan that I have sketched out above
- The longest run of tiles is going to be in the corridor, That is one that I would want to look good.
- I set up a center line there, parallel to the wall.
- The next longest run is across the living and dining rooms, so I set out another line parallel to the end wall and say centered in the dining room.
- Then comes a very important part, check the two lines for being square, or at right angles to each other.
- You may use a steel square or to be more accurate, use a 3,4,5 set out.
- Any triangle that has sides sides in the ratio of 3,4 and 5 always has a true right angle at the corner opposite the 5 side.
- So in this case I might use 3m x 4m x 5m, whatever fits in as long as the ratio is 3,4,5.
- I would then from the center lines mark out the position of the tiles each way.
- I may even in a complex area like this one lay a few loose tiles on the floor to see the position at a glance.
- Now comes the decision process. Trying to keep every wall joint looking good is not easy, and will usually take adjustments either way.
- The main thing I try to do is make the first view that a person gets on entering
- At this stage quite often a tiler would call me over and ask for my opinion, should we make the corridor perfect at the expense of a small cut in front of one of the double doors, or should we nudge them over a touch?
- There is rarely a full house job that is good at every wall, that's why I think it is good to have a second opinion.
- If one wall is a touch out of square, I give that one a wider cut if possible, at the expense of the opposite one that is parallel to the run of tiles.
- I take into account that that there may be furniture or cupboards against a wall.
- If the floor area is concrete and quite large, it will probably have construction / expansion joints in it. Arrange you tile expansion joints over them. More on expansion joints below.
Out Of Square Set out
What to do if a wall or walls are out of square.
I did a job where we built right up to a boundary line, and in a 6m run that end wall was about 300 out of square with the rest of the house. We used 200 x 200 tiles on a normal square pattern and at that wall the tiles were all cut on an angle. The rest of the walls were OK and the tiles were parallel to them. You could see the angle on the walls and on the ceiling as well as the floor. The job looked quite good and and it was just accepted that the wall in question was out of square.
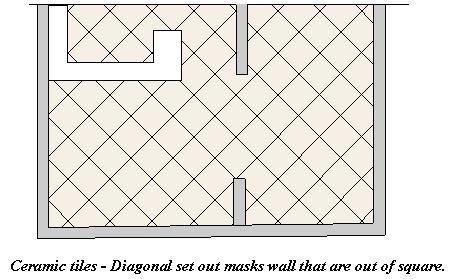
More difficult are the ones that are not obvious, only the tile pattern will show up any discrepancies in the wall layout. An option is a diagonal set out.
In the sketch above, I have made the bottom wall out of square with the rest and the two middle/corridor walls offset from each other. The 45 degree pattern lessens the impact of any irregularities. To do a floor like this, there is more work involved and more tile wastage.
I have seen diagonal floors like this, combined with a border tile that runs parallel with the walls that look very effective.
If you are an owner builder and starting from the ground up, the old saying "measure twice and cut once" is always good to bear in mind. A small mistake in the foundations can be hidden for ages, the form workers and concretors have been paid and long gone. Then at the end of the job the tiler picks it. Check your setting out!
When to Lay Tiles On A New Concrete Slab
Easy answer, leave it as long as you can. The longer the better.
It is ironic that we spend the first four weeks or longer trying to cure the concrete, that is slow down the drying process, by keeping it wet etc. Then we have to wait for it to dry out before we can tile.
Concrete when it is first poured, shrinks as it dries out. This is a process that is fairly rapid to start off, most of it happens in the first few hours, then the process slows down gradually.
In the normal construction period of a house, the floor tiles are laid when most of the house is finished, many times this may be over 12 weeks after the slab has been poured. The slab has to be fully cured and dry before tiles are laid, and in part this depends on the thickness of the slab. An average house slab is say 100mm (4") thick. I would never lay tiles on a slab this thick in less than 8 weeks.
I have heard a rule of thumb saying one month drying time for each inch of thickness in the slab.
So if you have a small addition that went up really quickly, hold off on laying the tiles. One trick that I always do on new jobs, is to tape a small piece of plastic to the concrete, and if after a day or so small beads of moisture show up underneath, then the concrete is still actively drying out and I leave it a week or so and try again.
Most building regulations require that all concrete floors on the ground, used for a habitable space should have an approved waterproof membrane under the concrete. This is to stop dampness coming up through the concrete. I have seen floor tiles separating from damp floors like this, and after being relaid, those coming up again. Typically a room is later made on a slab that was never intended for a habitable room. I you want to tile a slab that you are not sure of, then take advice from a good quality tile shop, there are membrane/underlay/isolation type products that will allow you to do this.
Expansion Joints-Movement Joints-Control Joints
Most materials used in home building move over time. This can be due to thermal movement or other causes. Ceramic tiles are no exception, so knowing this, in order to stop unsightly cracks we allow for any movement by using expansion joints. Put expansion joints at the following locations:-
- Around the edges of a floor, leave a clear 5mm gap. By clear I mean definitely no grout, but also don't let adhesive well up between the tile and the wall.
- Quite often a skirting goes over the gap, so no other work is needed, unless it is a ceramic tile skirting. In this case fill the gap with flexible sealer like "Caulk and Colours"
- On large floors provide a joint about every 5m or so. That is, say a minimum 4mm joint using flexible sealer.
- If the concrete floor has an existing expansion joint in it, put an expansion joint in the tiles, over the concrete joint.
- If you have an irregular and quite large crack (bigger than an average shrinkage crack) consider putting an expansion joint either side of it and laying the tiles over the crack with flexible adhesive.
- Vertical junctions of walls.
- Junctions of walls and cabinets/bench tops.
Comments (0)
