By Bill Bradley
There is no reason why the average do it yourself person can't build good looking and functional stairs. Whether it is an internal staircase or just a short few steps up onto an outside deck. The basics are the same.
One thing before we start. Where I live in Australia we have very tough building regulations. As set out in the building Code of Australia, BCA. Stairs cannot be built too steep, they can't be over a certain number of steps before a landing, the headroom must be considered, the handrails to have a minimum height with a minimum space between the balusters, a stair has to have a landing at a doorway and so on. Be sure to check your local regulations.
All the treads should be the same width, and all the risers should be the same height. This is basic. So often I see steps that are odd at the top or the bottom. This is very dangerous. A person living in the house gets used to the uneven heights, but a visitor could trip and fall.
Watch the head height clearance. Our minimum is 2030, ( just about door height). This is measured vertical from the nosing line of the tread. In effect you should not have to duck your head going up a stair.
A few examples
A simple straight flight of stairs is the easiest type to make. Then there are many variations, mostly to do with fitting a staircase into the available space. I am not about to go into spiral stairs at present.
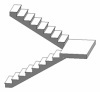
Below to the right is a stair split into two flights with a half space landing in between. I have used these a lot. They are compact and economical in space. It is also possible to put in an extra step in the middle of the landing to gain a bit of extra height in a small area.
Below left is a flight that has been split with a quarter space landing. Again it is possible to put more steps in the landing to gain ht quickly. With quarter space landings it is common to see three steps (winders) where the landing would be. You can vary the number or steps in each flight leading to and from a landing to suit your particular plan.

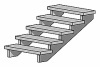

Stairs are also made in different ways. Above left is a short open string stair and to the right is a closed string stair, (showing the floor joist that it is made to sit on).
The two sloping pieces that support the treads and risers are call strings, or stringers.
The closed string stair has the treads and risers fitted into slots that are routered into the strings. It makes a very solid internal stair. Many times it fits between two walls, with a small room under.
Open string stairs can be very plain like one to an outside deck, or they can be very modern and made into a feature of the room.
Designing, Setting Out, Marking Out
A few years ago I had a contract to build several covered verandahs (outside timber decks with a roof over) to existing high set houses.The drawings detailed a single flight of about 17 steps. Easy and cheap, but not very efficient. Blind Freddie could see that they were a bad answer to the problem. The lady of the house had to walk about 5 m. one way then 5 m. back of extra travel each time she went from her kitchen down to the laundry, or from her car up to the kitchen with the shopping. We changed the design to stairs with half space landings, which were far more direct.
The first thing I usually do when Designing a stair is to fix on a tread width. If the space is small I have to go with what will fit, but it is mostly not a problem. Many of my stairs have hardwood timber treads. So the availability of decent timber is a first consideration.
The tread is the physical lump of wood, steel or concrete that you stand on. The GOING or RUN is the tread width less about 25mm to 30mm for toe space. This is the amount used in the calculations.
We used to build external stairs with pre-cast concrete treads that were 300 x 50, so using them my Going or RUN, would be 270 with a 30mm nosing.
The last flight I did was using laminated bamboo treads that were 280 by 40. ( I was impressed with the bamboo, very strong, stiff and good looking). So this stair was set out for a 250 GOING.
The RISE is the height difference between the top of each tread.
| RISER (R) | GOING (G) | SLOPE = 2R+G |
| MAXIMUM | MINIMUM | MAXIMUM | MINIMUM | MAXIMUM | MINIMUM |
| 190 | 115 | 355 | 240 | 700 | 550 |
The BCA provides these sizes for residential stair construction. Where you live may be different, but these are a good basis to design a stair anywhere.
The slope ratio of twice the RISE plus the GOING stops you from choosing a slope that is a bit extreme, like a maximum or minimum (G) and (R) together.
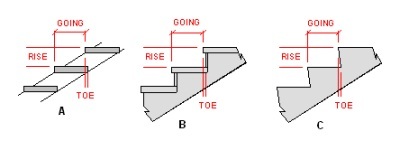
Above I have sketched three different types of stairs. You can see that the the same deal applies to them all. You have a rise, a going and a toe space. The example "C" is of a concrete stair. So many times you see concrete stairs without the inward slope to the riser that makes the toe space. It is wrong. It is just as easy to do it right.
The first thing I do after I have decided the basic design and I am ready to start marking out the material to make the stair is to measure the EXACT height. Of all the mistakes I have seen in stair building, getting the height wrong is it!
- Mistake number one, the height is measured from the upper floor down to the lower floor, but no account is taken of the final floor finishes. The top floor could still be waiting for installation of timber boards, or a topping could be applied to the bottom, followed by ceramic tiles. Find out first what the final finishes will be and allow for them.
- The landing(s) may have 20mm boards on them, but the stair treads are 40mm. You must allow for things like this. Treat each flight to and from a landing separately.
- Check the floor for level! Internally this is usually no problem. External stairs can have a slope to the ground under the stairs. The rise is from where the stair starts to where it finishes. Don't take it as being directly under the top step without checking the floor for level.
Stair Construction
For me, I have built stairs in three different types of construction with minor variations.
- All timber stair construction, years ago only. Very labour intensive and costly. If you are in N. America, it is I think, a different story, you still have lots of cheap timber available.
- Steel stairs, landings and supports, with hardwood, steel or concrete treads. By far the most common for me.
- Concrete stairs. Occasionally in house construction, but not often internally. Heaps of external ones. Quite a few concrete stairs on commercial jobs.
Unless we are talking about just a few steps, (less than 1M in Aust.) A well constructed, (strong) handrail system is required and it is usually designed and built into the stairs from the onset. Think about how you are going to do it from the start.
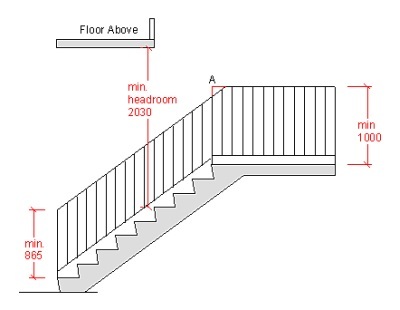
In the sketch above, you will see that the handrail to the stairs has to be a minimum of 865mm vertically above the the line of the nosings.
On the landing it changes to 1000mm. We used to have to do the little red section at "A" but now we can forget it and do the smoother transition. (That's right! The bureaucrats backed down).
The head height is taken vertical from the nosing line also.
We have many choices for the balusters, but we have to make sure that the gaps are no more than 125mm.